Sponsor bar

Sponsor bar
Thank you to our kind sponsors

Welcome to the Serengeti Trip 2011 Blog

Welcome to the Serengeti Trip 2011 Blog! We designed this website so that we can keep you posted on planning, packing and progress of our massive 70-day trip through 6 African countries early in 2011. The trip starts 20 January 2011 in Pretoria, South Africa, and takes us north through Botswana, Zambia and Tanzania to the legendary Serengeti National Park! From there we will head back south through Malawi, another part of Zambia and Zimbabwe...

Before the trip we will post photos and information on our route planning, vehicle upgrades, packing, equipment, etc. During the trip we will post daily diary entries by means of a satellite phone, so don't miss out! We will be posting in both English and Afrikaans. Please become a follower on this blog and subscribe to our RSS feed.
Enjoy the journey!


Monday, September 20, 2010

Hilux: The first big test...in Hwange!

After fitting the Toyota Hilux with a drawers system, aluminium canopy, two roof racks, a rooftop tent, a dust-prootfstrip and a pair of spotlights, it was time to test the vehicle in the field. What better place to put it through the ropes as Zimbabwe's Hwange National Park!?
Hwange National Park is home to one of the largest elephant populations in the world.

In August 2010 Villiers, his dad Francois, and friend David Morinelli (from Miami) visited Hwange for a week, testing the Hilux mostly on bumpy and corrugated gravel roads. It was also a great test for the drawers and aluminium canopy, as well as the two roof racks and rooftop tent.
The Hilux on it's first trip after the big face lift!
One of many fantastic hides in the park. This is where it all happens!
Time for a drink at Nyamandlovu hide near Main Camp.

Initally we planned to camp every night, but eventually we ended up camping only three nights - one at Nata Lodge in Botswana and two nights at Masuma in Hwange. It still gave up the chance to test the rooftop tent and the comfort level of the new drawers and aluminium cab.
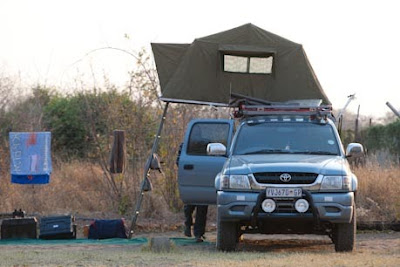
Our camp at Masuma Dam.
David quickly grabs something form the fridge. Thanks to the drawers it takes only a second or two.

To our delight everything worked. It worked very well! There's no comparison between camping with the standard fibreglass canopy and the aluminium cab! The fact that you can open the side flaps makes a huge difference! The drawers are also extremely handy and ideal for small things you need to reach for often, such as your laptop or extra drinks.
Just another stunning sunset in Africa!

At the end of the trip the verdict was unanimous - the Hilux performed like a star and is nearly ready for the big Serengeti Trip! The suspension support worked like a gem and virtually no dust was sucked into the back. The front roof rack was also the ideal place to fasten three of our crates.

The Hwange trip was a huge success! And the park surprized us all - the people are friendly and ready for the world to return. The waterholes are full and teaming with game, the camps are clean and neat, there's fuel in the towns and shops are well-stocked! There's no reason not to visit Hwange anymore!


Hilux Facelift Part VII: Suspension support

After fitting the Toyota Hilux with a drawer system and Alu-Cab on the back, and then bolting the roof top tent to the top, the back of the car was sagging too much for comfort. In order to lift the back a bit, the vehicle was fitted with Loadhog suspension support on the rear leaf springs. This was a quick 20-minute job and made all the difference!
One of the two Loadhog suspension support blades above the rear leaf springs.
If you allow the vehicle's back to sag too much, it will eventually get damaged on bumpy, uneven roads as the suspension is unable to carry the weight. To see how the Hilux progessed to this stage, visit the Hilux Transformation page.

Hilux Facelift Part VI: No more dust!

Dust. Dust. DUST! One of the biggest frustrations on Africa's back roads is sucking in dust into your canopy, covering all your belongings in thick layer every time you drive on a gravel road. For this reason I didn't hesitate to fit the back flap of the Hilux with a thin, dust-proof strip.
This simple piece of rubber film keeps most of the dust out of the canopy!
It might seem like a small, unnecessary thing, but believe me - it's worth it! This one was fitted at Safari Centre. And here's something important to remember: Fit the dust-proof strip BEFORE you fit the drawers, because it goes underneath. If you wait till after, the drawers will have to be undone and lifted to get the strip in underneath. The Hilux is nearing the end of its transformation. Look out for the final look on the Hilux Transformation page.

Hilux Facelift Part V: Front roof rack

One roof rack on the back was never going to be enough. We will need space for a second spare wheel, two gas bottles, two jerry cans and other odds and ends such as wood, crates, etc. For these we decided to fit a front roof rack from African Outback. Apart from brackets for the gas bottles and jerry cans, it also has a side-bracket for a high-lift jack.
The front roof rack with high-lift jack and three crates.
The front roof rack from above.
Apart from an additional structure to carry some of the load, a front roof rack also becomes a great vantage point from which to take photographs of the vehicle in its surroundings! I have a suspicion that we'll be spending a lot of time up there on our big trip! Follow the Hilux's transformation on the Hilux Transformation page.

Hilux Facelift Part IV: Rooftop tent

I've never been a big fan of rooftop tents. They're claim to fame is the fact that they are so "easy" to open and close, saving you lots of time setting up camp. There are, however, quite a few drawbacks to rooftop tents. For one, you need to close them every time you want to go on a game drive - something that can be extremely annoying when you are camping in one spot for a long time. Then there's a space issue - you can't stand inside and it gets very tight when you are two people inside. Despite my reserves about it, I decided to fit an old rooftop tent of my dad's, just for a test run.

Step one: Remove the canvas cover.
Step two: Pull the tent open by pulling on the ladder and pushing from the other side.
Step four: Pull the tent all the way open and fit the ladder and window poles.
Step four: All you have to do now is put your bedding inside and you're done!
Once it's up a rooftop tent really does look impressive, but I'm still not convinced that it's a better option than a simple three-man tent on the ground. Only time will tell whether we take the rooftop tent with to the Serengeti... Follow the Hilux's progress on the Hilux Transformation page.

Hilux Facelift Part III: Alu-Cab

Fitting the custom drawers in the back was only the first step to making packing as easy as possible in the back. The next step was to replace the standard fibreglass canopy with an aluminium canopy. 
The Hilux with its origional fibreglass canopy.
After looking at different models, it was decided to fit an Alu-Cab with flaps on both sides, as well as a full-length flap at the back. With all three flaps open everything on the inside is within arm's length. This comes in especially handy at border posts and road blocks where officials want to have a quick look at your vehicle's contents, or simply when you want to take out something small from the back at a picnic spot on the roadside.
With all three flaps of the Alu-Cab open, nothing is hard to reach anymore.
The drawers and aluminium canopy used together - easy as pie to get to grab someting from the fridge!
All the flaps of the aluminium canopy can lock, providing even more protection to the valuables inside. The canopy was designed with a roof rack on top, and in the next post we look at the rooftop tent. Keep following the progress on the Hilux Transformation page.

Hilux Facelift Part II: Spotlights

Step two in the Hilux's transformation was to fit a pair of spotlights on the front. Although we don't plan to drive at night, you never know when a breakdown or other unforeseen circumstances force you to take on the dangerous African roads at night. The biggest danger is livestock and wildlife that crosses the road. Hitting a cow or kudu could mean the end of the trip, not to mention the end of lives...

A brand new pair of spotlights fitted!
It was decided to fit the spotlights low on the front bumper to allow maximum support and minimum vibration to the brackets. Fitting the spotlights to the roof rack can cause an irritating reflection on the bonnet and therefore this option wasn't even considered.

Now that we have our drawers and extra powerful lights it's time for an aluminium cab. Follow the Hilux's facelift on the Hilux Transformation page - the end result will be impressive!